The superior self-hosted ShareX server
ass is a self-hosted ShareX upload server written in Node.js. I initially started this project purely out of spite. ass aims to be as unopinionated as possible, giving users & hosts alike the ability to modify nearly everything.
By default, ass comes with a resource viewing page, which includes metadata about the resource as well as a download button & inline viewers for images, videos, & audio. It does not have a user dashboard or registration system: this is intentional! Developers are free to create their own frontends using the languages & tools they are most comfortable with. Writing & using these frontends is fully documented below, in the wiki, & in the source code.
Notice (Sep 2023)
The current release version 0.14.x is now in maintenence mode. What this means is I'll only be providing updates to catastrophic issues.
However! I'm currently working on a new version, 0.15.0, which is a lot more stable and organized. I have no ETA but please know that I'm continuing to work on it when I can. Version 0.14.x is still functional, just a bit rough around the edges.
Developers 🧡
ass was designed with developers in mind. If you are a developer & want something changed to better suit you, let me know & we'll see what we can do!
Code quality
Features For users
Type What is it?
Zero-width spaces
When pasted elsewhere, the URL appears to be just your domain name. Some browsers or sites may not recognize these URLs (Discord sadly no longer supports these as of April 2023)
Mixed-case alphanumeric The "safe" mode. URL's are browser safe as the character set is just letters & numbers.
Gfycat
Gfycat-style ID's (for example: https://example.com/unsung-discrete-grub). Thanks to Gfycat for the wordlists
Original The "basic" mode. URL matches the same filename as when the file was uploaded. This may be prone to conflicts with files of the same name.
Timestamp The quick but dirty mode. URL is a timestamp of when the file was uploaded, in milliseconds. This is the most unique mode, but also potentially the longest (Gfycat could be longer, easily). Keep in mind this is vulnerable to iteration attacks
Installation
ass supports two installation methods: Docker (recommended) & local (manual).
Docker
Expand for Docker/Docker Compose installation steps
Docker Compose is the recommended way to install ass. These steps assume you are already family with Docker. If not, you should probably use the local installation method. They also assume that you have a working Docker installation with Docker Compose v2 installed.
Install using docker-compose
git clone https://github.com/tycrek/ass.git && cd ass/
./install/docker-linux.sh (uses #!/bin/bash)install\docker-windows.bat (from Command Prompt)The upload token will be printed at the end of the setup script prompts. This is the token that you'll need to use to upload resources to ass. It may go by too quickly to copy it, so just scroll back up in your terminal after setup or run cat auth.json.
You should now be able to access the ass server at http://localhost:40115/ (ass-docker will bind to host 0.0.0.0 to allow external access). You can configure a reverse proxy (for example, Caddy; also check out [my tutorial]) to make it accessible from the internet with automatic SSL.
What is this script doing?
It creates directories & files required for Docker Compose to properly set up volumes. After that, it simply builds the image & container, then launches the setup process.
How do I run the npm scripts?
Since all 3 primary data files are bound to the container with Volumes, you can run the scripts in two ways: docker compose exec or npm on the host.
# Check the usage metrics docker compose exec ass npm run metricsHow do I update?Run the setup script
docker compose exec ass npm run setup && docker compose restart
Run npm on the host to run the setup script (also works for metrics)
(You will have to meet the Node.js & npm requirements on your host for this to work properly)
npm run setup && docker compose restart
Easy! Just pull the changes & run this one-liner:
# Pull the latest version of ass & rebuild the image
git pull && docker compose build --no-cache && docker compose up -d
What else should I be aware of?
Deploying ass with Docker exposes five volumes. These volumes let you edit the config, view the auth or data files, or view the uploads/ folder from your host.
uploads/share/config.jsonauth.jsondata.jsonLocal
Expand for local installation steps
git clone https://github.com/tycrek/ass.git && cd ass/
npm i --save-dev to install the required dependencies (--save-dev is required for compilation)npm run build to compile the TypeScript filesnpm start to start ass.The first time you run ass, the setup process will automatically be called & you will be shown your first authorization token; save this as you will need it to configure ShareX.
Using HTTPS
For HTTPS support, you must configure a reverse proxy. I recommend Caddy but any reverse proxy works fine (such as Apache or Nginx). A sample config for Caddy is provided below:
ass.example.com {
    reverse_proxy localhost:40115
}
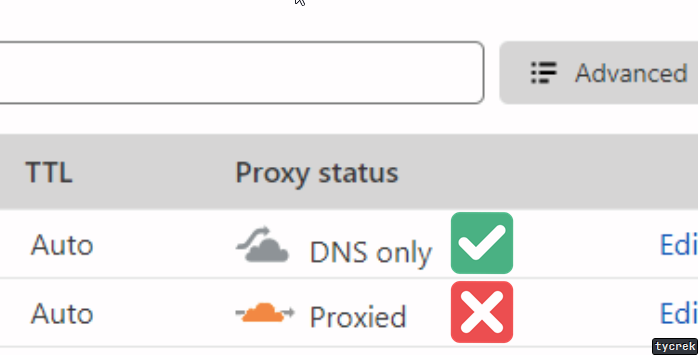
In your Cloudflare DNS dashboard, set your domain/subdomain to DNS Only if you experience issues with Proxied. This may not be necessary for all users.
Configure ShareX
Destinations > Custom uploader settings...
Image, Text, & File
POST
https://your.domain.name.here/
Form data (multipart/form-data)
file (literally put "file" in the field)Authorization
npm start on first run){json:.resource}
{json:.thumbnail}
{json:.delete}
{response}
. in the above & replace {} with $ (i.e. $json:resource$)sample_config.sxcu can also be modified & imported to suit your needsHeader overrides
If you need to override a specific part of the config to be different from the global config, you may do so via "X" HTTP headers:
Header Purpose
X-Ass-Domain
Override the domain returned for the clipboard (useful for multi-domain hosts)
X-Ass-Access
Override the generator used for the resource URL. Must be one of: original, zws, gfycat, random, or timestamp (see above)
X-Ass-Gfycat
Override the length of Gfycat ID's. Defaults to 2
X-Ass-Timeoffset
Override the timestamp offset. Defaults to UTC+0. Available options are whatever Luxon accepts (for example: America/Edmonton or UTC-7)
Fancy embeds
If you primarily share media on Discord, you can add these additional (optional) headers to build embeds:
Header Purpose
X-Ass-OG-Title
Large text shown above your media. Required for embeds to appear on desktop.
X-Ass-OG-Description
Small text shown below the title but above the media (does not show up on videos)
X-Ass-OG-Author
Small text shown above the title
X-Ass-OG-Author-Url
URL to open when the Author is clicked
X-Ass-OG-Provider
Smaller text shown above the author
X-Ass-OG-Provider-Url
URL to open when the Provider is clicked
X-Ass-OG-Color
Colour shown on the left side of the embed. Must be one of &random, &vibrant, or a hex colour value (for example: #fe3c29). Random is a randomly generated hex value & Vibrant is sourced from the image itself
Embed placeholders
You can insert certain metadata into your embeds with these placeholders:
Placeholder Result
&size
The files size with proper notation rounded to two decimals (example: 7.06 KB)
&filename
The original filename of the uploaded file
×tamp
The timestamp of when the file was uploaded (example: Oct 14, 1983, 1:30 PM)
Server-side embed configuration
You may also specify a default embed config on the server. Keep in mind that if users specify the X-Ass-OG-Title header, the server-side config will be ignored. To configure the server-side embed, create a new file in the share/ directory named embed.json. Available options are:
titledescriptionauthorauthorUrlproviderproviderUrlcolorTheir values are equivalent to the headers listed above.
Webhooks
You may use Discord webhooks as an easy way to keep track of your uploads. The first step is to create a new Webhook. You only need to follow the first section, Making a Webhook. Once you are done that, click Copy Webhook URL. Finally, add these headers to your custom uploader:
Header Purpose
X-Ass-Webhook-Url
The Webhook URL you copied
X-Ass-Webhook-Username
(Optional) the "username" of the Webhook; can be set to whatever you want
X-Ass-Webhook-Avatar
(Optional) URL to an image to use as the Webhook avatar. Use the full URL including https://
Webhooks will show the filename, mimetype, size, upload timestamp, thumbail, & a link to delete the file. To disable webhooks, simply remove the headers from your config.
Customizing the viewer
If you want to customize the font or colours of the viewer page, create a file in the share/ directory called theme.json. Available options are:
Option Purpose
font
The font family to use; defaults to "Josefin Sans". Fonts with a space should be surrounded by double quotes.
bgPage
Background colour for the whole page
bgViewer
Background colour for the viewer element
txtPrimary
Primary text colour; this should be your main brand colour.
txtSecondary
Secondary text colour; this is used for the file details.
linkPrimary
Primary link colour
linkHover
Colour of the hover effect for links
linkActive
Colour of the active effect for links
borderHover
Colour of the hover effect for borders; this is used for the underlining links.
Custom index
By default, ass directs the index route / to this README. Follow these steps to use a custom index:
share/ directory called index.html or index.js.
index.html as an HTML file and will send it to the client.index.js as a Node.js file that exports a function representing Express middleware. ass will pass all handling of the index to this function. The function should take three arguments: (req, res, next). Some code samples for common use cases are provided below.index.html and index.js are present, the index.html file will be served first.Custom index code samples
Redirect to a custom frontend registration page
module.exports = (req, res, next) => res.redirect('/register');
Custom 404 page
To use a custom 404 page, create a file in the share/ directory called 404.html. Restart ass, and any requests to missing resources will return HTTP 404 with the contents of this file.
If there's interest, I may allow making this a function, similar to the custom index.
File storage
ass supports three methods of file storage: local, S3, or [Skynet].
Local
Local storage is the simplest option, but relies on you having a lot of disk space to store files, which can be costly.
S3
Any existing object storage server that's compatible with [Amazon S3] can be used with ass. I personally host my files using Digital Ocean Spaces, which implements S3.
S3 servers are generally very fast & have very good uptime, though this will depend on the hosting provider & plan you choose.
New user system (v0.14.0)
The user system was overhauled in v0.14.0 to allow more features and flexibility. New fields on users include admin, passhash, unid, and meta (these will be documented more once the system is finalized).
New installs will automatically generate a default user. Check the auth.json file for the token. You will use this for API requests and to authenticate within ShareX.
ass will automatically convert your old auth.json to the new format. Always backup your auth.json and data.json before updating. By default, the original user (named ass) will be marked as an admin.
Adding users
You may add users via the CLI or the API. I'll document the API further in the future.
CLI
npm run cli-adduser <username> <password> [admin] [meta]
Argument Purpose
username string
The username of the user.
password string
The password of the user.
admin? boolean
Whether the user is an admin. Defaults to false.
meta? string
Any additional metadata to store on the user, as a JSON string.
Things still not added:
Developer API
ass includes an API (v0.14.0) for frontend developers to easily integrate with. Right now the API is pretty limited but I will expand on it in the future, with frontend developer feedback.
Any endpoints requiring authorization will require an Authorization header with the value being the user's upload token. Admin users are a new feature introduced in v0.14.0. Admin users can access all endpoints, while non-admin users can only access those relevant to them.
Other things to note:
/api/.200 status code. Any errors will use the corresponding 4xx or 5xx status code (such as 401 Unauthorized).POST/PUT for create/modify, and response codes such as 409 Conflict for duplicate entries. This compliance may not be 100% perfect, but I will try my best.API endpoints
Endpoint Purpose Admin?
GET /user/
Returns a list of all users
Yes
GET /user/:id
Returns the user with the given ID
Yes
GET /user/self
Returns the current user
No
GET /user/token/:token
Returns the user with the given token
No
POST /user/
Creates a new user. Request body must be a JSON object including username and password. You may optionally include admin (boolean) or meta (object). Returns 400 if fails.
Yes
POST /user/password/reset/:id
Force resets the user's password. Request body must be a JSON object including a password.
Yes
DELETE /user/:id
Deletes the user with the given ID, as well as all their uploads.
Yes
PUT /user/meta/:id
Updates the user's metadata. Request body must be a JSON object with keys key and value, with the key/value you want to set in the users metadata. Optionally you may include force: boolean to override existing keys.
Yes
DELETE /user/meta/:id
Deletes a key/value from a users metadata. Request body must be a JSON object with a key property specifying the key to delete.
Yes
PUT /user/username/:id
Updates the user's username. Request body must be a JSON object with a username property.
Yes
PUT /user/token/:id
Regenerates a users upload token
Yes
Custom frontends - OUTDATED
Please be aware that this section is outdated (marked as of 2022-04-15). It will be updated when I overhaul the frontend system.
Update 2022-12-24: I plan to overhaul this early in 2023.
ass is intended to provide a strong backend for developers to build their own frontends around. Git Submodules make it easy to create custom frontends. Submodules are their own projects, which means you are free to build the router however you wish, as long as it exports the required items. A custom frontend is really just an Express.js router.
For a detailed walkthrough on developing your first frontend, consult the wiki.
Data Engines
Papito data engines are responsible for managing your data. "Data" has two parts: an identifier & the actual data itself. With ass, the data is a JSON object representing the uploaded resource. The identifier is the unique ID in the URL returned to the user on upload. Update August 2022: I plan to overhaul Papito and how all this works eventually. If this comment is still here in a year, kick message me.
Supported data engines:
Name Description Links
JSON JSON-based data storage. On disk, data is stored in a JSON file. In memory, data is stored in a Map. This is the default engine.
PostgreSQL Data storage using a PostgreSQL database. node-postgres is used for communicating with the database.
Mongoose Data storage using a MongoDB database. mongoose is used for communicating with the database. Created by @dylancl
A Papito data engine implements support for one type of database (or file, such as JSON or YAML). This lets ass server hosts pick their database of choice, because all they'll have to do is enter the connection/authentication details & ass will handle the rest, using the resource ID as the key.
For a detailed walkthrough on developing engines, consult the wiki. Outdated!
npm scripts
ass has a number of pre-made npm scripts for you to use. All of these scripts should be run using npm run <script-name> (except start).
Script Description
start
Starts the ass server. This is the default script & is run with npm start.
build
Compiles the TypeScript files into JavaScript.
dev
Chains the build & compile scripts together.
setup
Starts the easy setup process. Should be run after any updates that introduce new config options.
metrics
Runs the metrics script. This is a simple script that outputs basic resource statistics.
purge
Purges all uploads & data associated with them. This does not delete any users, however.
engine-check
Ensures your environment meets the minimum Node & npm version requirements.
Flameshot users (Linux)
Use this script. For the KEY, put your token. Thanks to @ToxicAven for creating this!
Contributing
Please follow the Contributing Guidelines when submiting Issues or Pull Requests.
Credits
Twice a month we will interview people behind open source businesses. We will talk about how they are building a business on top of open source projects.
We'll never share your email with anyone else.