Audiobookshelf
Self-hosted audiobook and podcast server
- Project Website
- https://github.com/advplyr/audiobookshelf
- Platform
- License
- gpl-3.0
- Category
- Usecase
- Audio books Podcast
- Technology
- javascript Shell VueJS Dockerfile SCSS
- Offers premium version?
- NO
- Proprietary?
- NO
- About
-
Documentation · User Guides · SupportAbout
Audiobookshelf is a self-hosted audiobook and podcast server.
Features
- Fully open-source, including the android & iOS app (in beta)
- Stream all audio formats on the fly
- Search and add podcasts to download episodes w/ auto-download
- Multi-user support w/ custom permissions
- Keeps progress per user and syncs across devices
- Auto-detects library updates, no need to re-scan
- Upload books and podcasts w/ bulk upload drag and drop folders
- Backup your metadata + automated daily backups
- Progressive Web App (PWA)
- Chromecast support on the web app and android app
- Fetch metadata and cover art from several sources
- Chapter editor and chapter lookup (using Audnexus API)
- Merge your audio files into a single m4b
- Embed metadata and cover image into your audio files (using Tone)
- Basic ebook support and ereader
- Epub, pdf, cbr, cbz
- Send ebook to device (i.e. Kindle)
- Open RSS feeds for podcasts and audiobooks
Is there a feature you are looking for? Suggest it
Android App (beta)
Try it out on the Google Play Store
iOS App (beta)
Available using Test Flight: https://testflight.apple.com/join/wiic7QIW - Join the discussion
Build your own tools & clients
Check out the API documentation
Organizing your audiobooks Directory structure and folder names are important to Audiobookshelf!See documentation for supported directory structure, folder naming conventions, and audio file metadata usage.
InstallationSee install docs
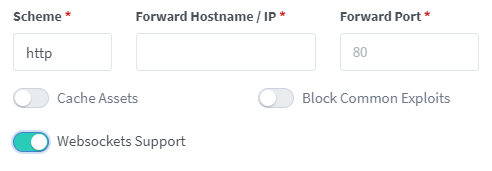
Reverse Proxy Set Up Important! Audiobookshelf requires a websocket connection. Note: Subfolder paths (e.g. /audiobooks) are not supported yet. See issueNGINX Proxy Manager
Toggle websockets support.
NGINX Reverse Proxy
Add this to the site config file on your nginx server after you have changed the relevant parts in the <> brackets, and inserted your certificate paths.
server { listen 443 ssl; server_name <sub>.<domain>.<tld>;Apache Reverse Proxyaccess_log /var/log/nginx/audiobookshelf.access.log; error_log /var/log/nginx/audiobookshelf.error.log; ssl_certificate /path/to/certificate; ssl_certificate_key /path/to/key; location / { proxy_set_header X-Forwarded-For $proxy_add_x_forwarded_for; proxy_set_header X-Forwarded-Proto $scheme; proxy_set_header Host $host; proxy_set_header Upgrade $http_upgrade; proxy_set_header Connection "upgrade"; proxy_http_version 1.1; proxy_pass http://<URL_to_forward_to>; proxy_redirect http:// https://; }}
Add this to the site config file on your Apache server after you have changed the relevant parts in the <> brackets, and inserted your certificate paths.
For this to work you must enable at least the following mods using
a2enmod:sslproxyproxy_httpproxy_balancerproxy_wstunnelrewrite
<IfModule mod_ssl.c> <VirtualHost *:443> ServerName <sub>.<domain>.<tld>ErrorLog ${APACHE_LOG_DIR}/error.log CustomLog ${APACHE_LOG_DIR}/access.log combined ProxyPreserveHost On ProxyPass / http://localhost:<audiobookshelf_port>/ RewriteEngine on RewriteCond %{HTTP:Upgrade} websocket [NC] RewriteCond %{HTTP:Connection} upgrade [NC] RewriteRule ^/?(.*) "ws://localhost:<audiobookshelf_port>/$1" [P,L] # unless you're doing something special this should be generated by a # tool like certbot by let's encrypt SSLCertificateFile /path/to/cert/file SSLCertificateKeyFile /path/to/key/file</VirtualHost> </IfModule>
Some SSL certificates like those signed by Let's Encrypt require ACME validation. To allow Let's Encrypt to write and confirm the ACME challenge, edit your VirtualHost definition to prevent proxying traffic that queries
/.well-knownand instead serve that directly:<VirtualHost *:443> # ... # create the directory structure /.well-known/acme-challenges # within DocumentRoot and give the HTTP user recursive write # access to it. DocumentRoot /path/to/local/directory ProxyPreserveHost On ProxyPass /.well-known ! ProxyPass / http://localhost:<audiobookshelf_port>/ # ... </VirtualHost>SWAG Reverse ProxySee LinuxServer.io config sample
Synology Reverse Proxy- Open Control Panel > Application Portal
- Change to the Reverse Proxy tab
- Select the proxy rule for which you want to enable Websockets and click on Edit
- Change to the "Custom Header" tab
- Click Create > WebSocket
- Click Save
Middleware relating to CORS will cause the app to report Unknown Error when logging in. To prevent this don't apply any of the following headers to the router for this site:
- accessControlAllowMethods
- accessControlAllowOriginList
- accessControlMaxAge
From @Dondochaka and @BeastleeUK
Example Caddyfile - Caddy Reverse Proxy
Run from source Contributingsubdomain.domain.com { encode gzip zstd reverse_proxy <LOCAL_IP>:<PORT> }This application is built using NodeJs.
Dev Container SetupThe easiest way to begin developing this project is to use a dev container. An introduction to dev containers in VSCode can be found here.
Required Software:
Note, it is possible to use other container software than Docker and IDEs other than VSCode. However, this setup is more complicated and not covered here.
Install the required software on Windows with wingetNote: This requires a PowerShell prompt with winget installed. You should be able to copy and paste the code block to install. If you use an elevated PowerShell prompt, UAC will not pop up during the installs.
winget install -e --id Docker.DockerDesktop; `
winget install -e --id Microsoft.VisualStudioCode
Install the required software on MacOS with homebrew
brew install --cask docker visual-studio-code
Install the required software on Linux with snap
sudo snap install docker; \
sudo snap install code --classic
After installing these packages, you can now install the Remote Development extension for VSCode. After installing this extension open the command pallet (
ctrl+shift+porcmd+shift+p) and select the command>Dev Containers: Rebuild and Reopen in Container. This will cause the development environment container to be built and launched.You are now ready to start development!
Manual Environment Setup
If you don't want to use the dev container, you can still develop this project. First, you will need to install NodeJs (version 16) and FFmpeg.
Next you will need to create a
dev.jsfile in the project's root directory. This contains configuration information and paths unique to your development environment. You can find an example of this file in.devcontainer/dev.js.You are now ready to build the client:
npm ci
cd client
npm ci
npm run generate
cd ..
Development CommandsAfter setting up your development environment, either using the dev container or using your own custom environment, the following commands will help you run the server and client.
To run the server, you can use the command
npm run dev. This will use the client that was built when you rannpm run generatein the client directory or when you started the dev container. If you make changes to the server, you will need to restart the server. If you make changes to the client, you will need to run the command(cd client; npm run generate)and then restart the server. By default the client runs atlocalhost:3333, though the port can be configured indev.js.You can also build a version of the client that supports live reloading. To do this, start the server, then run the command
(cd client; npm run dev). This will run a separate instance of the client atlocalhost:3000that will be automatically updated as you make changes to the client.If you are using VSCode, this project includes a couple of pre-defined targets to speed up this process. First, if you build the project (
ctrl+shift+borcmd+shift+b) it will automatically generate the client. Next, there are debug commands for running the server and client. You can view these targets using the debug panel (bring it up with (ctrl+shift+dorcmd+shift+d):-
Debug server—Run the server. -
Debug client (nuxt)—Run the client with live reload. -
Debug server and client (nuxt)—Runs both the preceding two debug targets.
How to Support
-
Cast macOS and Linux Audio/Video to your Google Cast and Sonos Devices2.12K

Subscribe to Open Source Businees Newsletter
Twice a month we will interview people behind open source businesses. We will talk about how they are building a business on top of open source projects.
We'll never share your email with anyone else.